|
Your
First Windows Mobile Database App: SQL Server
2005 Compact Edition (CE) on Windows Mobile
6
The first app is always the
hardest. When you're learning a new technology,
you just want to get something to work. The
problem is, walkthroughs always leave out crucial
details, assuming you already know about important
downloads or configurations. Not this time. This
walkthrough will step you through every detail of
building a simple mobile database app using
Windows Mobile 6 and SQL Server 2005 CE. The only
thing missing is your imagination.
| | |
The first one is always the hardest. It's a rule. You can
read a thousand how-to articles, from simplistic one line
"Hello, World" to complicated Northwind demos, but until you
get your hands dirty with your first bona fide mobile app, you
never really get it. This walkthrough will go over all the
basics and, better yet, build an app you can actually have fun
with.
In this walkthrough, you will:
- Download all the necessary software to build a working
Windows Mobile 6 application
- Create a simple form using the Windows Mobile 6
Professional template
- Incorporate a pre-built SQL Server CE database or build
a new database of your own
- End up with a handy tool for creating randomized story
titles, band names, or whatever else you fancy using it for.
The premise: if you're a fan of Edward Gorey's charmingly macabre Amphigorey
books, then you know the late great master's penchant for odd
titles like "The Gashlycrumb Tinies" and "The Curious Sofa."
This app will randomly generate such titles for you. You'll be
working with a small SQL Server database called AmphiData with
a single table having the following structure:
      AmphiData

      -     Titles

            -     TitleID: int, Identity, Primary Key

            -     Adjective: nvarchar(255), nullable

            -     Noun: nvarchar(255), nullable
You'll be able to open up the table and look at the data
during the course of the walkthrough, but here's a small
sample so you know what to expect:
| TitleID |
Adjective |
Noun |
| 1 |
Listing |
Ostrich |
| 2 |
Tainted |
Onion |
| 3 |
Lazy |
Urn |
| 4 |
Peering |
Spectre |
| 5 |
Bewildered |
Guest |
Before you
start:
Depending on how much, if any, mobile
development you've already done, you have a bit of software to
install. Here is a list of the downloads you will need to
build this app:
- Visual Studio 2005 Service Pack 1
- Microsoft SQL Server 2005 Compact Edition
Developer Software Development Kit
- Microsoft SQL Server 2005 Compact Edition
Tools for Visual Studio 2005 Service Pack 1
- Windows Mobile 6 Software Development Kits
(Standard and Professional)—optionally, install both
Standard and Professional additions to leverage your code
across even more devices. This walkthrough, however, will
focus on Professional, with the ultimate goal of deploying
to a touch-screen device such as Cingular 8525 or Motorola
Q. (Note: some companies, such as Cingular and Samsung, have
announced limited upgrade support to Windows Mobile 6, with
Cingular offering free upgrades for the Samsung Blackjack,
Palm Treo 750, and Cingular 8525. But until, and IF,
OEMs/Mobile Operators support a firmware upgrade for their
existing products, you'll have to wait until new Windows
Mobile 6 products hit the streets before you can actually
deploy your new app.)
Additional Downloads
While Windows Mobile 5
included the .NET Compact Framework 1.0, you had to deploy
.NET CF 2.0 and SQL Server CE in addition to your app. The
good news for developers is that Windows Mobile 6 devices
include both the .NET CF 2.0 Service Pack 1 (SP1) and
Microsoft SQL Server 2005 Compact Edition preinstalled in ROM.
So you don't need to distribute or install either to get your
app to work on a user's device.
But in case you're reading this with the intention of
building an older app, here are the downloads you would've
needed:
.NET Compact Framework 2.0 Service Pack 1
Redistributable
Microsoft SQL Server 2005 CE
If you happen to have an actual device you'd like to deploy
to, you will want this, as well:
Microsoft ActiveSync 4.5
Create the Amphigorey
Project
So let's get started.
Step One: Create a New Project
Now that you've
installed the various SDKs, you should see some new options in
Visual Studio. Open up Visual Studio and start a New ->
Project. Under Visual C#, which you'll be using for this
walkthrough, you should see a new folder of project templates
called "Smart Device." Expand it and select a Windows Mobile 6
Professional Device Application, as in Figure 1.
Call it "Amphigorey".
Step Two: Rename the Form
Once the new project
has been created, you should see Form1 in design view, with a
mobile skin. In the Solution Explorer, right-click the form
and choose Rename, then call it "NewTitle". When asked "Would
you like to perform a rename in this project of all
references…" click Yes.
Next, click on the form itself. In the Properties tab,
change the Text property to "New Title". Under the FormFactor
property, "Windows Mobile 6 Classic" is selected by default.
Change that to "Windows Mobile 6 Professional" (check the
Properties tab in Figure 2).
Step Three: Add AmphiData Database
While
functionality is fundamentally the same, SQL Server 2005 CE
differs a bit from SQL Server 2005 in how you incorporate data
objects into your solution. You can create and edit a CE
database in SQL Server Management Studio as well as within
Visual Studio, as with other SQL Server versions. But with CE
the database file itself (the .sdf file) gets copied to the
project directory and deployed with the app. Fortunately,
because SDK wizards handle creating the connection string and
myriad other details, you don't have to work too hard to build
and incorporate the database.
For this walkthrough, you have an option: you can either
practice building a database from scratch and filling it with
sample data, or you can pull in an existing database. If you
want to create your own, keep reading. Otherwise, skip ahead
to Three Bee.
Step Three Aye: Create a New Database
The easiest
way to create a CE database is through the Data Configuration
Wizard:
- Choose Data -> Add New Data Source from the main
menu.
- Select Database as your data source type.
- When asked "Which data connection should your app use,"
choose New Connection.
- In the Add Connection form, your Data Source should
already be set to ".NET Framework Data Provider for SQL
Server Compact Edition." Under Connection Properties, click
Create. Name the database AmphiData. For this walkthrough,
I've left the password blank. (See Figure 3.)
- Click Test Connection to make sure it works so far, then
OK.
- Back in the wizard, when you click Next, you should get
a prompt asking if you "want to copy the file to your
project and modify the connection." Say Yes.
- When choosing database objects, check Tables since you
won't be using Views in this particular walkthrough. (See Figure 4.)
Later, when you experiment on your own, you may want to try
implementing Views instead.
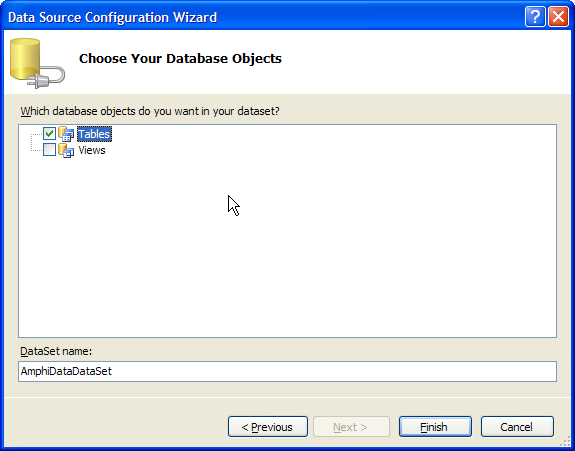 |
|
| Figure
4. Database Objects for New Database
|
At this point, you'll notice that a few new items have been
added to your solution and IDE automatically:
- In the Server Explorer tab in the left, you'll see the
new Data Connection, currently flagged is disconnected.
Right-click and select Refresh to change the flag, though
that'll also happen when you expand it later.
- You'll find "AmphiDataDataSet" under the Data Sources
tab.
- You'll also see a new file in the Solution Explorer
called AmphiData.sdf.
- If you expand References in the Solution Explorer,
you'll see that System.Data.SqlServerCe has been added
automatically.
Next, you'll create the data table and add some sample
data.
- In the Server Explorer, expand AmphiData.sdf and
right-click on Tables.
- Create a new table called Titles. Add 3 fields as shown
in Figure
5 and described at the beginning of this article.
- Right-click on the Titles table and choose Open. You can
use the sample data listed at the beginning of this article
or make up your own.
That's it for the new table. If you want to practice
pulling in an existing table, then delete AmphiData.sdf and
AmphiDataDataSet.xsd from the Solution Explorer and keep
reading. Otherwise, skip ahead to Step Four.
Step Three Bee: Add an Existing Table
I've
already created a table with 33 records in line with the
Amphigorey theme. If you want to use it, download the
AmphiData.sdf file [link to AmphiData.sdf] and pull it into
your project using the following steps:
Right-click on the Amphigorey project and choose Add ->
Existing Item.
Select "All Files (*)" as file type and navigate to your
download location for AmphiData.sdf. When it's added, it will
be copied to your project directory so your original download
will remain untouched.
As soon as the file is added, you'll be prompted to choose
the database objects. Notice that Tables is expandable down to
the column level. After this walkthrough, try experimenting
with different data objects, including a single column or some
new Views you've created. But for now, check Tables, as in Figure 6.
 |
|
| Figure
6. Database Objects for Existing Database
|
Once the database has been added, you can see it in the
Solution Explorer, along with a new item:
AmphiDataDataSet.xsd. If you were to explore
AmphiDataDataSet.Designer.cs, you would see that all the
plumbing has been done for you, including table adapters,
connection string, and INSERT/DELETE/UPDATE code.
In the Server Explorer on the left, you'll also see your
new data connection to AmphiData.sdf. Expand it (this
automatically connects to it) all the way down to the Titles
table. Right-click on Titles and select Open. You should see
33 records (
Figure 7).
Step Four: Design the Form
Your form will be
super-simple: two menu options and three text labels.
- First, add three labels somewhere in the center of the
form, as in Figure 8.
Leave them blank, use default values, or give them new
values, like I've done in Figure 9.
Leave the control names as their default values.
- Add your menu options by simply clicking on the light
blue band at the bottom of the skin display, as in Figure 9.
As you can see, adding new menu options involves clicking
either up or over, depending on whether you want another
option or a flyout. Each of those nodes has the same two
options, so you can create incredibly complex menus very
quickly.
Here you'll just add two options: Go and Exit. Your
finished form should look something like Figure 10.
Step Five: Add Data Components
Now you'll add
some components that you'll be able to code against in the
next step.
- From the Toolbox, drag a BindingSource component (under
Device Data) onto the form.
- In the properties for bindingSource1, set DataSource to
AmphiDataDataSet and DataMember to Titles, in that order.
(See Figure
11.)
- Go ahead and Build the solution without running it. Keep
an eye on the Toolbox. You should see Visual Studio create
some new components for you to use under a new "Amphigorey
Components" tray. Specifically, you should see
AmphiDataDataSet and TitlesTableAdapter. (See Figure
12.)
- Drag TitlesTableAdapter onto the form designer. This
creates an instance called titlesTableAdapter1 by default.
Step Six: Add the Code
Double-click on the form itself. This should create the
NewTitle_Load method.
Add the following statement in this method: this.titlesTableAdapter1.Fill(this.amphiDataDataSet.Titles);
This
loads your data set with actual data via the TableAdapter.
Back in the form, double-click on Go to create the event
handler for menuItem1_Click.
Add the following code to this method: try
{
int cnt = this.amphiDataDataSet.Titles.Count;
Random rnd = new Random();
int adjective = (rnd.Next(0, cnt + 1));
int noun = (rnd.Next(0, cnt + 1));
this.label2.Text =
this.amphiDataDataSet.Titles[adjective].Adjective.ToString();
this.label3.Text =
this.amphiDataDataSet.Titles[noun].Noun.ToString();
}
catch (Exception err)
{
MessageBox.Show(err.Message);
}
You may have noticed that the data in the sample table has
the same number of Adjectives as it does Nouns. I've leveraged
that to simplify the code slightly, so that instead of doing
queries, this code simply looks at the column itself. It
determines the number of records, then pulls one of them at
random, setting the label to that value.
- Lastly, add some Exit code. If you've used Windows
Mobile devices then you know that closing the form doesn't
end the app. This can especially throw you off when testing.
So I like to include an actual Exit button to end execution
altogether. Double-click Exit to generate the event handler
for menuItem2_Click.
- Add the following code to this method:
this.Close();
Step Seven: Test It!
Hit F5 to kick it off. When asked where to deploy the
project, choose the Windows Mobile 6 Professional Emulator.
This is a good place to play around by trying out the other
emulators and seeing how the app looks. Figure 13
shows what your new app looks like in the emulator.
The big test: Click "Go". You should see the title change
to something new and slightly sinister. Click it a few times
and see if anything interesting comes up. (See Figure 14
for a few of my results.)
Improve This Demo
You
have the basics now, but this app still has a lot of room for
improvement. Here are some ideas for taking it to the next
level.
- You'll notice that this app is not very aware of screen
size and dimensions. Read "Adapt Your App" to get some ideas on how
to improve this, then test your solutions.
- Build on your screen awareness by creating a Windows
Mobile 6 Standard version of this app for non-touchscreen
devices (i.e. Smartphones). If you downloaded the Standard
version of the Windows Mobile 6 SDK then you already have
everything you need, even the code.
- As mentioned, this app has a major cheat: all columns
have the same number of values, with no nulls. Try
populating your dataset using a query to select all non-null
values. Hint: when viewing the data connection in the Server
Explorer tab, right-click on the table and choose New Query,
then use the Query Builder.
- Amphigorey may not be your thing—that's fine. Add a new
table for Garage Band Names. Use the Adjective-Noun form
again, for example: "The Garbage Monkeys", "The Flaming
Lips", "The Wet Slice." Even better, add a third field with
something else entirely. Then hook it up to the form.
- Better yet, open up the code so that you can have any
number of tables, with any number of columns. For example,
if you write fiction, then you can create one table for
Settings, one for Protagonists, and one for Antagonists.
Each of those will have a variable number of columns and
rows. Create a form that pulls up the table names and lets
you select one, then pulls one row at random for each column
and displays the results as a concatenated string.
Where to Go From
Here
Short answer: go
to MEDC 2007. You'll find an entire track dedicated to
building Mobile Applications, including a ton of sessions on
using databases. Also, at MEDC on May 1, Microsoft will
release the Windows Mobile 6 SDK Technical Refresh. It will
include new documentation, the latest emulators, support for
basic AJAX applications and links to Line of Business
frameworks, samples and documentation.
In addition, here are some resources for building on what
you've learned here:
Walkthrough: A Database Master-Detail
Application
An introduction to SQL Server 2005 Compact
Edition
Rapid Application Development Using SQL Server
2005 Compact Edition and Visual C#.NET
Application Deployment with Shared and Private
Deployments (C#)
SQL Server 2005 Compact Edition How-to
Tutorials
Create Setup Files for your Windows Mobile
Applications Using Visual Studio 2005
Developing and Deploying Pocket PC Setup
Applications
|
|
|
|
 |
|


 Print
Print


 Justin Whitney is a regular contributor
to DevX.com and Jupitermedia. He currently lives in San
Francisco, where he consults for leading high-tech firms and
writes about emerging technologies.
Justin Whitney is a regular contributor
to DevX.com and Jupitermedia. He currently lives in San
Francisco, where he consults for leading high-tech firms and
writes about emerging technologies.  Dzone.com
 Digg.com
 Slashdot.org
 Reddit.com
 Del.icio.us